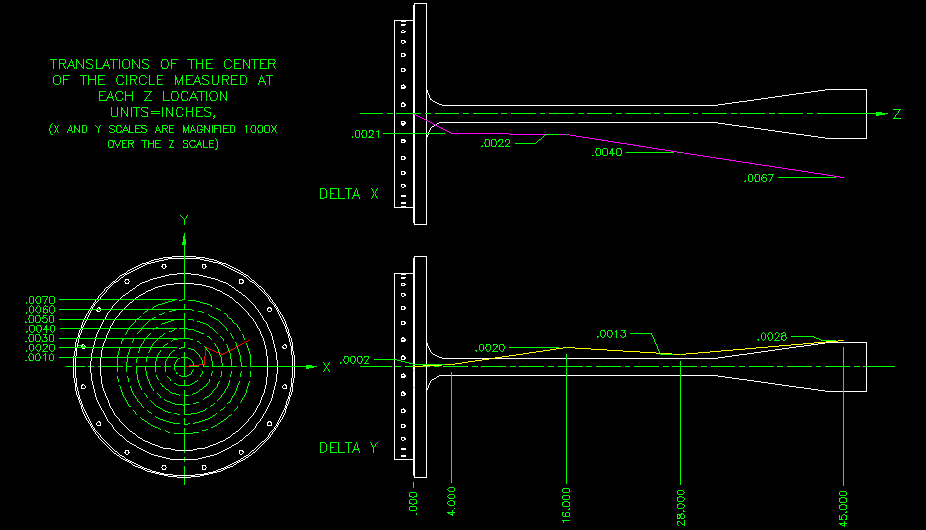
Runout measurement of the MiniBooNE Inner Conductor Piece 1-2, 1/4/01The following graph was made from measurements of horn inner conductor piece 1-2, done in Lab 3 by Bill Pritchard. The deviations shown represent the offset between the ideal axis and the center of the circular cross-section of the part at each Z location along the part. Total runout would be twice the magnitude of the offset of the center of the cross-section. The drawing calls for .005 inches total runout maximum. The largest runout on the part is .015, at the large cylindrical end of the "nose". The graph shows the inner conductor to be slightly kinked. Earlier, ultrasonic measurements were made of the wall thickness of the part. There seems to be a correlation between wall thickness variations and the runount of the "nose" of the part. The part is being pulled sideways on the same side that the higher wall thickness was measured. The difference measured was a .120" wall on one side of the tube, and a .110" wall thickness on the other, for the portion of the Z length of the tube within about 10 inches upstream (smaller Z) of the conical section. This is consistent with the the notion that if the part had a non-uniform wall thickness, then residual stresses in the material would tend to pull it off axis. During welding the part will change again. We should be able to control the straightness of the inner conductor by "wash" weld passes, as was done for the NuMI horn.
Back to the MiniBooNE Horn Main Menu
Back to the Bartoszek Engineering Home Page
|
